No Copilot tab in Word Options? How to turn it on or off
You searched for how to turn Copilot off in Word. You found a clear answer. It told you to open File ▸ Options ▸ Copilot. But there is no Copilot entry in your Options list.
Or you found one that starts “open the Word menu”. That is the macOS path. It does not exist on Windows.
Neither guide is wrong. They were written against a different build of Word than yours, and Microsoft has moved this setting more than once.
This page covers both cases. How to tell which one you are in, and what works in each.
First: check. You may already have it
The Copilot entry does exist in current Microsoft 365 builds. It sits in the Word Options list between Proofing and Save. That is an easy spot to skim past when you scan the top and the bottom of a list.
So look there first. If you find it, this is a thirty-second job (step 2) and you can skip the rest of this page.
If it is not there, that is normal too. Whether the entry appears depends on your build, your license, and your IT policy if Word came from work or school. Copilot’s rollout has been staged. Two people can both be on “the latest Word” and see different Options lists. So a correct-looking answer can still fail. It assumes a dialog your installation does not have.
Before you start
Two things change the answer:
- Personal vs work/school account. If Word came from an employer or a university, Copilot is usually managed centrally. The steps below may be greyed out, or may not stick. Only your IT administrator can change it. That is not your fault.
- You may not be able to remove it permanently. Some recent builds have reduced or removed the ability to switch Copilot off. If a setting you turned off comes back after an update, you are not imagining it.
Steps
-
Check whether you have the Copilot entry at all. Open Word, choose File, then Options. In the category list on the left, look for Copilot, between Proofing and Save.
If it is there, do step 2. If it is not, skip to step 3.
-
If it is there: clear “Enable Copilot”. Select Copilot. The pane reads “Options for working with Copilot in Word”. It holds one checkbox: Enable Copilot. Clear it and click OK. Then close and reopen Word. The change does not fully apply until you restart.
You are done. The rest of this page is for people without that entry.
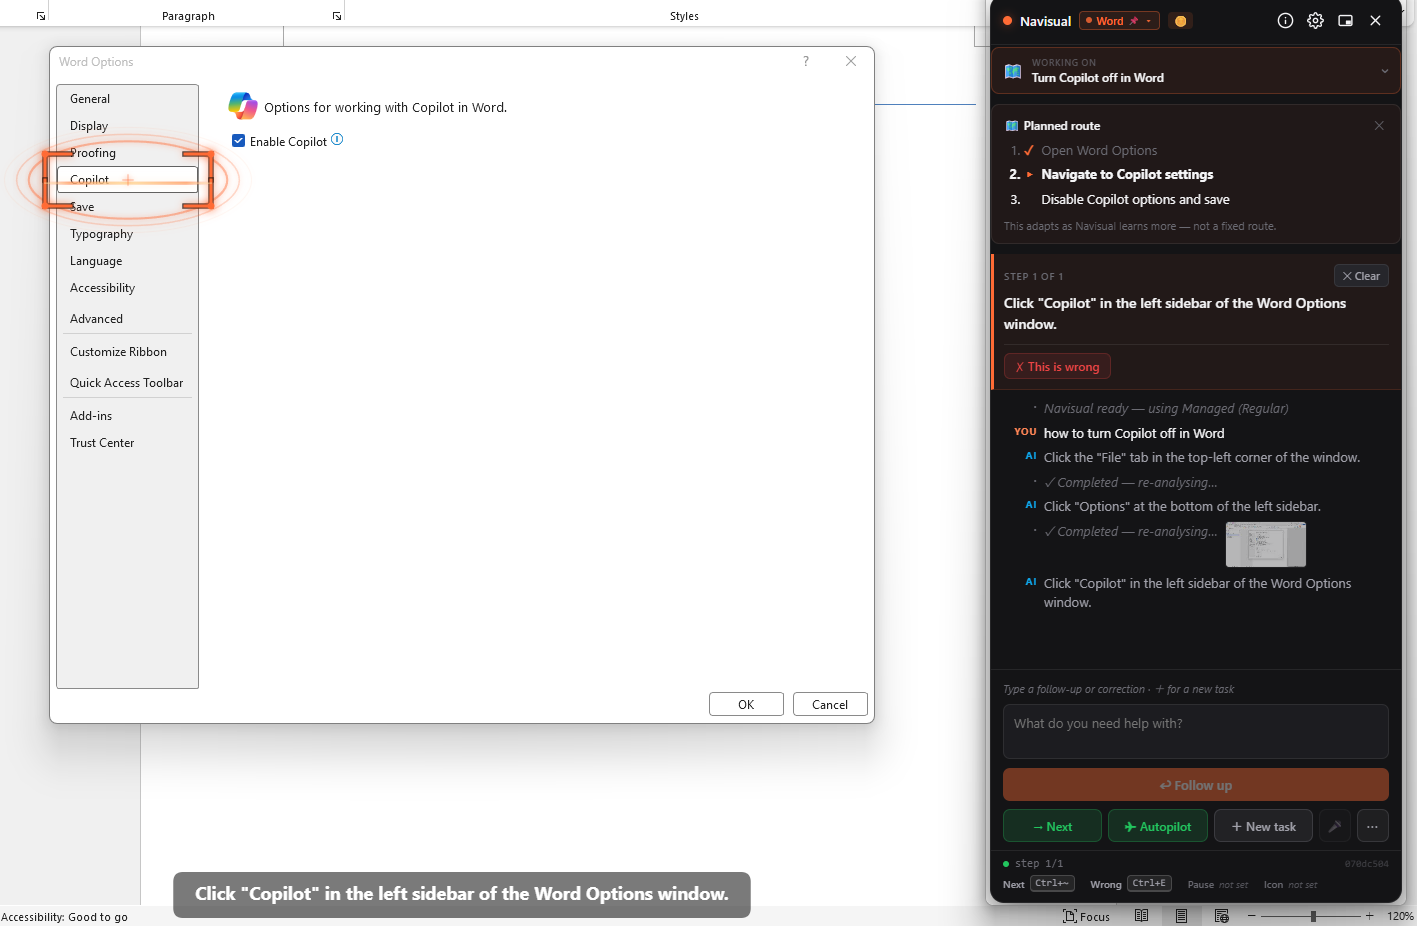
Copilot sits between Proofing and Save. Easy to miss if you scan the top and the bottom of the list. The pane holds a single “Enable Copilot” checkbox. The highlight and the panel on the right are Navisual pointing the way. -
If it is missing: open Account Privacy. Choose File, then Account. Not Options. Under Account Privacy, click Manage Settings.
This is the step that trips people up. It sits in a completely different place from every other Word setting, and nothing in the path contains the word “Copilot”.
-
Turn off “Turn on experiences that analyze your content”. The Privacy Settings window opens. Scroll to Connected experiences. You may need to scroll down inside the window to reach it. The first sub-section is “Experiences that analyze your content”. Clear the checkbox labeled “Turn on experiences that analyze your content”. Click OK, then close and reopen Word.
Do not confuse it with the checkbox just below, “Turn on experiences that download online content”. That one covers templates and online images, not Copilot.
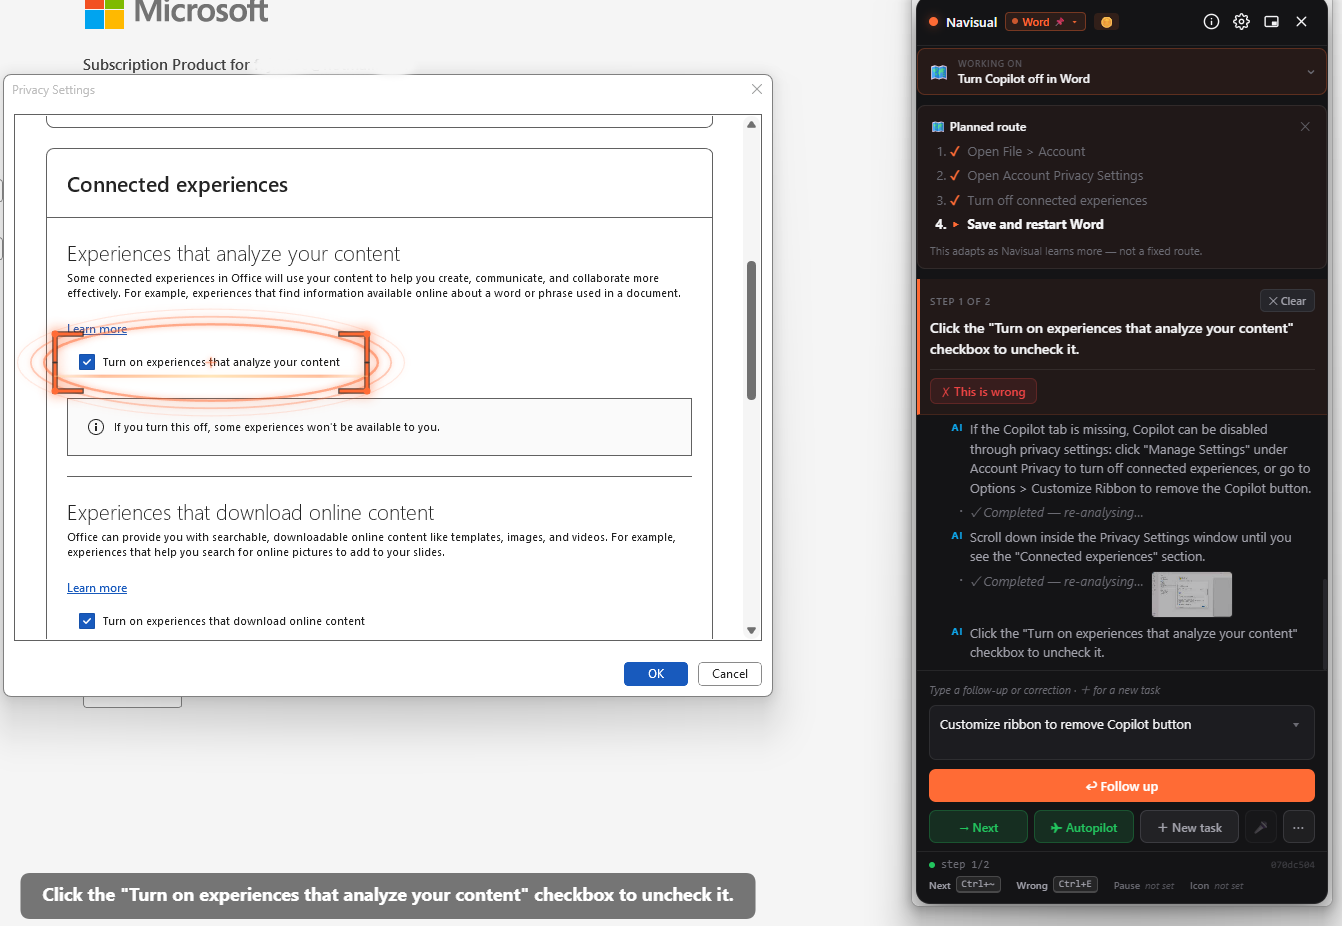
The checkbox you want is the first one, under “Experiences that analyze your content”. Not the “download online content” one below it. The panel on the right is Navisual walking this path. The highlight is where it pointed.
If step 4 looked different from this
This dialog varies the most between versions, and published guides disagree about it. Some tell you to clear “Turn on optional connected experiences” instead. If your Privacy Settings window has that checkbox and not the one named above, clear it. In builds where it is the only option, it covers the same ground.
If you see several, “Turn on experiences that analyze your content” is the one that governs Copilot. Copilot reads your document to work, so it belongs to the analyze-your-content category, not the download-online-content one.
A trade-off: this is not a Copilot switch. It governs a whole category of features. Microsoft says so in the dialog itself:
If you turn this off, some experiences won’t be available to you.
That includes features unrelated to Copilot. Some research, translation and design tools also read your document to work. That is the price of this route. It is why the dedicated Enable Copilot checkbox in step 2 is the better option whenever you have it.
If it comes back after an update
This happens. You did nothing wrong. Microsoft has changed Copilot’s availability and its opt-out more than once, and a feature update can restore a setting you switched off.
If it keeps coming back and you want a version that never had Copilot, the durable answers are a perpetual Office release, or a Microsoft 365 plan that excludes Copilot. Fighting the setting after every update is not a fix.
Why this is so hard to find
Three things make this a bad search:
- The setting moved. Answers written six months apart describe different dialogs. Both were right when they were written.
- The working path never mentions Copilot. Nothing in File ▸ Account ▸ Account Privacy ▸ Manage Settings contains the word you searched for.
- The right answer depends on your build, which no article can see.
The third one is the real problem. Written instructions describe a screen. The only thing that matches your screen is what is on it.
*Checked against Word 16.0.20228 (Microsoft 365, personal subscription) on Windows 11 in September
- Both paths above were confirmed on a real installation, including the exact checkbox labels. Microsoft changes this area often. If you find it has moved again, the structure of the answer probably still holds even where the wording has not.*
Steps like these are easier when something points at the actual control on your screen. Navisual reads what is in front of you and shows you where to click. It never clicks for you.